

I just had my second to last CSA pickup and it’s making me a little weepy. I must confess that Rodney is ready to move on and not have our usual Saturday morning pickup stress. While he enjoys the fruits of my labor, he’s less enthusiastic about the fruit itself.
But me…I’m going to miss it. There are parts of it that I won’t miss – namely the omnipresent need each Saturday to wash several pounds of greens. But I love the ease of reaching into my crisper and pulling out something gorgeous that inspires me to cook.
Last week was no different. We returned from pickup with our usual bags (plural) of produce, which included the following:
- Choice of Tomatoes
- Buttercup Squash
- Cubanelle Peppers
- Parsnips
- Romaine
- Spinach
- Adirondack Blue Potatoes
- Onions
- Cilantro
- Parsley
I’ve become totally obsessed with buttercup squash and one of the first things I do now that it’s squash season is immediately slice the squash and bake it at 350 degrees with a few sprigs of fresh herbs. Otherwise it sits on my counter and mocks me when I’m too busy during the weekdays to think about roasting squash for dinner.
Buttercup is sweeter than some of the other varieties that you might encounter – the butternuts, the acorns. And like all squash, it sits well in the fridge once it’s been cooked, making it useful for all kinds of recipes down the road.


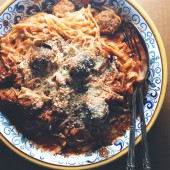
With the buttercup roasted and in the fridge, I set about making dinner. I had planned for roast chicken, but as so often happens up at the lake, we started drinking wine, and by 5PM I was slightly wobbly and had no inherent interest in making dinner. But I was hungry, and came up with the idea to make the top layer of scalloped potatoes for dinner using nothing but a few potatoes, onions, cream, parm, herbs, and a few cloves of garlic.


The true story behind these potatoes is even more shameful than their slightly embarrasing beginnings. Having fed the kids, Rodney and I found ourselves starving when the potatoes eventually came out of the oven (slightly too crispy from inattention) and rather than eat them at the table like civilized adults, we plunked ourselves right down on the floor in the kitchen, the platter between us, sleeves rolled up, cutlery free, and dove right in.
I rationalized that they were more similar to nachos than a potato side dish, which didn’t make things any better. My id was ashamed, and I’ve vowed never to eat dinner on the floor again to protect my easily-bruised ego.
To make the scalloped potato sheet pan:
Layer the following ingredients in a sheet pan that’s been rubbed with olive oil and covered in parchment paper: 3 medium red potatoes, thinly sliced; 2 cipollini onions, thinly sliced; 3 garlic cloves, lightly crushed. Pour ½ cup of chicken stock and ½ cup of heavy cream over the potatoes. Toss some parmesan cheese (about 1/3 cup) over the top and sprinkle with a little more salt and freshly-ground pepper. Scatter thyme leaves on top of the potatoes and bake at 350 degrees for about 90 minutes (or until the potatoes are golden and bubbling). Since I was drinking wine, I lost track of time and nuked them a little longer than I should have but they were still wonderfully delicious.
I know that I haven’t talked about what happened to the squash yet; that’s still to come…for now, let’s talk turkey.
Perhaps because I’m not cooking Thanksgiving this year, but have had some kilowatt cravings for turkey. Buying a whole turkey for our family is a little excessive as two big appetites don’t make up for three little ones. And we all know how I feel about poultry breast. If you’re unfamiliar, I urge you to check out this post where I review my feelings in detail. However, on occasion, Whole Foods will surprise me with the gift of drumsticks, and when I see them at the store, I’ll buy a pack or two.
And what better way to prepare them than to dry-brine the drumsticks overnight, David Chang-style, with a touch of salt and sugar. And because it’s turkey…a little dried sage. I also used my David Chang pork belly technique on the drumsticks with a high temp sear in the oven, followed by a low and slow bake at 250 degrees. It produces the best kind of drumstick – brown and crispy on the outside with juicy leg meat inside.

We ate the majority of the drumsticks on their own, as you would at your local Renaissance Fair with sleeves rolled up and juices dribbling down our chins. Minus the wenches of course.
What, might you ask, does this have to do with my CSA? Leftover turkey is wonderful in all kinds of dishes, and don’t you start thinking about tetrazzini. Although come to think of it, prepared with good ingredients, tetrazzini would likely be spectacular. Turkey is great in anything from soup to fried rice, but I used it here in lettuce cups using my CSA romaine. The lettuce cups are really healthy – gluten and dairy-free – and get a sweet and spicy kick from curry powder and dried cranberries.

To make the turkey drumsticks:
Dry rub the drumsticks with a few tablespoons of salt, sugar, and dried sage. Let sit in the fridge overnight, tightly wrapped with saran wrap. The next day, let the drumsticks come to room temp and then bake in a hot oven at 425 degrees for 30-45 minutes until nice and crispy. Turn the oven temp way down to 250 degrees and continue to bake for a few more hours- they won’t dry out at this temp and with their juices sealed in- test with an oven thermometer if you’re unsure (leg meat should read 165 degrees). They should be done in 1 hour, but I let mine go for 3 hours and they were perfect.
To make the lettuce wraps:
Wash and dry a few large romaine leaves and set aside. Shred or chop the meat from 2 drumsticks and mix with a few tablespoons of mayonnaise, a teaspoon of curry powder, 1 rib of chopped celery and 2 tablespoons of dried cranberries. Give the whole thing a stir, season if necessary with salt and pepper, and then pile into the romaine leaves, garnishing with a few fresh cilantro leaves.
And now that I’ve mentioned David Chang, I might as well fully admit to the fact that I made pork belly again. I’m pretty sure that cooking it twice in 10 days is as severe an offense as making banana cream pie twice in that same time period. I can’t help it, I’m completely addicted to it, and even worse, I’ve gotten my kids to love it too. Lauren was begging for pork belly last week with a slightly crazed look in her eye.

The good news is that it’s so rich that the kids can only manage a few bites before leaving the rest for me to finish. Which is clearly the reason I can’t kick my last 5 lbs of Summer weight gain, a fleshy ring around the abdomen that Rodney refers to as “the Summer Grinse”.
I’ve also found a solution that uses up the leftovers without the guilt: Caesar salad with a light and lemony dressing, garlic anchovy croutons, a few bits of leftover pork belly, a dusting of parm, and a poached egg. If I never eat another Caesar salad again, it’ll be too soon. I know that I always make this comment, but really.

To make the pork belly Caesar with a soft-boiled egg:
Season 2 pieces of pork belly (approx. 2 lbs in total) with pork seasoning blend – I love my new Denny Mike’s Sublime Swine seasoning blend that I picked up at Whole Foods. Alternatively you can simply use a little salt and sugar. Roast the pork belly at 425 degrees for 45 minutes and then turn it down to 225 and roast for another 45 minutes. Let cool and then slice and reserve for your salad (you’ll have extra to have on hand for dinner—check out last week’s ramen and Banh Mi if you missed those recipes).
When you’re ready to make the salad, soft boil an egg in boiling water for 5 minutes 10 seconds, and then run under cool water and peel. While the egg is cooking, melt an anchovy into olive oil on medium heat in a sautee pan, and then add some chopped garlic. Toss some toasted bread cubes into the flavored oil, and give it a good stir, coating the bread cubes well (adding a little more olive oil if needed). Toss some romaine hearts in a little olive oil, lemon juice, and a few drops of Worcestershire sauce. Add your bread cubes, pork belly, and then slice the egg on top.
Now I’m sure that I’ve been keeping you on pins and needles about what I’ve done with the squash. Keep in mind that these posts aren’t always written in chronological order lest you think that my poor squash withered for 6 days before consumption. A day or two after I’d made my squash, I was rifling through the crisper drawer in my fridge and realized that I had about a million (plus or minus) peppers scattered about. Here were a few of my subjects:

At about the same time, I’d gone through a pantry cleaning exercise that had left me with 20 cans of beans and a solitary bag of dried hominy. Having never used hominy in my cooking, I was curious, and though they’d be a lovely pairing with the peppers and squash.
Posole is a Mexican dish that has about as many variations as Southwestern chili. Squash isn’t traditional in Posole, but it’s an ingredient common to Mexican cuisine, so I thought that it might work well in my dish. I added a few dried guajillo peppers, less for heat, and more for depth of flavor. Topped with some crushed tortilla chips and torn cilantro, it was a warming dish for a crisp Fall day. Plus, I fell madly and deeply in love with the dish when Sam, who at 4 years old still rocks one hell of a lisp, claimed that “Poth-ole” is his new favorite soup.

To make the posole:
Cook a cup of dried hominy according to package directions. I ended up cooking the hominy in my slow cooker by covering them with water by a few inches, turning the cooker to high to bring the whole thing to a boil, and then turning down to low – maybe because I was using very old hominy found at the back of my cupboard, but it took an overnight cook in the slow cooker to cook them properly and see the “flowering” that’s supposed to occur when the hominy is done.
Slice 1 buttercup squash in half, and scoop out the seeds. Slice the halves into wedges and lay on a baking sheet, brush with olive oil, and then sprinkle with salt and pepper. If you’d like, add a few sprigs of thyme to help perfume the squash as it bakes. Bake at 350 degrees for 45 minutes until brown and crispy.
To make the soup, Sautée 1/2 white onion, 1 poblano, 1 yellow mariachi, 1 red mariachi and 1 cubanelle and a crushed garlic clove with a pinch of salt in a medium saucepan with a touch of grapeseed oil until almost soft. This makes a fairly mild soup, so if you’d like to kick up the heat a notch, add another spicy pepper to the mix (e.g. jalapeno or even a finely-diced habanero).
While the vegetables are softening, grind 2 guajillo peppers in a food processor. Once the vegetables are done, add the ground guajillo along with 1 tablespoon of ground roasted cumin (or alternatively regular cumin if that’s what you have), and stir for a minute more. Add the following: 2 cups cooked Posole, 2 cups of shredded pork shoulder, the buttercup squash (skin removed and diced)and 1 quart of pork stock. (My pork shoulder and pork stock were leftovers from last week, so be sure to check last week’s CSA post for directions on how to prepare them).
Boil the soup, and then simmer for 20 minutes to blend the flavors, seasoning further with salt and pepper if necessary. Serve the posole in large bowls garnished with crushed tortilla chips and torn cilantro leaves.
I suppose that I’ve left you wondering about another topic as well. Tomatoes, what to do, what to do…I swore that you wouldn’t see a raw tomato in this post and I’ve kept my promise so far. It would be a shame to let you down with a tomato and burrata special, so I give you this: a tomato and goat cheese tart.

I found the pastry recipe online at Food 52 and was excited to use it because my husband adores a cornmeal crust. The recipe on Food 52 was originally for a gruyere base, topped with heirloom tomatoes, which sounds divine, but I had goat cheese to use. And lots of it. So Dijon, tomato, goat cheese and green onion it was. The crust was really crispy and definitely a keeper, so if you’re up for making a tart – either sweet or savory – I highly recommend checking this one out.
To make the pastry for the tomato tart:
Make the pastry from the recipe on Food 52, separating the dough into two flattened disks:
To make the tomato tart:
While the dough is resting in the fridge, thinly slice 1 large heirloom tomato and a few smaller ones, and then lay them out on paper towels. Sprinkle the tomato slices with salt and allow them to drain a little of their water. Preheat your oven to 375 degrees. Take the tart dough out of the fridge and roll into 9-10-inch disks. Brush each pastry disk with 2 tablespoons each of Dijon mustard. Top with the tomatoes, leaving a 1-inch barrier between the tomatoes and the edge of the pastry. Crumble a 4-ounce log of goat cheese onto the tarts (splitting the cheese evenly between the two tarts), and then fold up the pastry around the tomato/goat cheese mixture. If you’d like, you can then sprinkle with some herbs (although I didn’t have any on hand.) Brush the outside of the pastry with beaten egg white and bake in the oven on a baking sheet for 40-45 minutes.
Last but not least, let’s talk apples. As I’ve mentioned in previous posts, I don’t receive apples with my CSA but I imagine that some of you do, and others are bringing them home by the bushel from local orchards.
What generally happens in our house is that our CSA vegetables take up too much room in the fridge, forcing less perishable items onto the counter. Which is a nice way of saying that apples get the short end of the stick and are left to wither and die. Leading to this…

Shrivelly (is that a word?), soft, destined for the apple equivalent of the sausage factory: sauce or baked goods.
Which is when apples get the last laugh because they simply shine in baked goods. I couldn’t imagine Fall without some sort of baked apple product sitting on my counter. Just check out this apple skillet pancake: cinnamon, apples, your basic pancake batter, all baking together in the oven until they’ve reached their golden perfection.

To make the cinnamon apple skillet pancake:
Whisk 2 eggs until frothy; whisk in 1/2 cup each milk and flour. Peel, core and slice 1 apple; cook in an ovenproof 8-inch skillet with 2 tablespoons butter + 1 tablespoon sugar and 1/2 tablespoon of cinnamon until just soft. Add the batter and bake at 450 degrees until puffy and golden, about 15 minutes.
And then this one….I can’t claim to have developed the recipe, but in fact stole it from dear Deb Perelman from Smitten Kitchen. Who, in fact, took the idea from a reader who had asked her about whether she’d made Versunkener Apfelkuchen. Which begs the question, from whom did the Germans steal this recipe?

I’ll leave you with that philosophical question, and a link to her recipe, because even if you can’t solve the world’s culinary mysteries, you should at least have the chance to make a damn good apple cake at home.
So that’s a wrap for this week. Stay tuned next week for more squash, more fun, and a continued tomato salad-free zone. Have a great week everyone!


As it’s Canadian Thanksgiving, I loved reading about your turkey drumsticks. A favourite with me. Love all the recipes. The photos are mouth watering. Very inspiring.
Such a yummy, fun post – love it all! Esp the scalloped potatoes!